Well, it doesn’t qualify me for the Handyman Hall of Fame, but I pulled off a household DIY that, frankly, I thought was beyond me. Try to follow the technical explanation here; in our master bathroom the doohickey that you push in to make the water come out of the shower nozzle instead of the bath nozzle was regularly being expelled with force every once in a while. When I say with force I mean that the doohickey flew out of its home, heretofore known as the doohickey hole, with such great force that it would slam into the wall on the other end of the bathtub, which is approximately five feet, with enough force to sound like small arms fire. The first time it happened it missed Celeste by about two inches.
Anyway, for months we were able to finesse the doohickey back into its hole and it would work for a while and then, seemingly out of nowhere it would try to impale one of us. Finally, this week the doohickey refused to be finessed and it was time for repair. As I’ve documented many times here I’m no Bob Vila and this project intimidated me, especially since it took a plumber an hour to fix the drain system in the same tub. I figured I was in for a long week.
So, I pulled the face plate off of the faucet to see if I could figure out what to do. When I pulled it off I found that the doohickey was actually a part of a larger piece that screws directly into the whatchamajiget that tells the water whether or not to be hot, cold or indifferent. For a while I thought I might have to shut off the main water supply, but then I realized that if I kept the faucet off it would act as a shut off valve since it was located at the top of this particular operation. This was of great relief to me since the last time I shut off the main water supply we had all kinds of creepy noises coming from our pipes for days afterward, which of course deprived Celeste (aka Bat Ears) of her beauty sleep.
My next step was to jump online and see if anyone sold replacement doohickeys. My worry is that like everything else in this house our shower is a tad on the old side and I was worried that replacement parts would be hard to find. After a little hunting and pecking I found a plumbing supply site that had a picture of what appeared to be our shower equipment. Here it is:
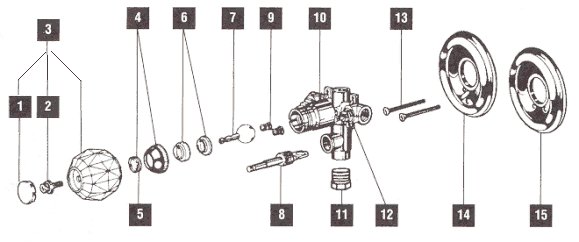 It seems that our shower faucet is a Delta 602, and that the doohickey is actually called a diverter. After a little more hunting I found that the diverter is sold in most hardware stores, so this morning I went over to Lowes and purchased my shiny new doohickey. Once I came home I attempted to remove the old doohickey but unfortunately my wrench set seemed to be shy the 7/8″ size I needed and unfortunately my adjustable wrench and lock pliers were too bulky to get the job done. I gave it my best shot but despite my sweating and cursing I couldn’t get my crusty old doohickey out of its hole.
Unfortunately the lack of appropriate tools is common for my DIY projects so I made my way back to Lowes to buy my new wrench. I bought it and all the other wrenches over 5/8″ just to be safe (5/8 being the largest wrench I could find back home) and justified it in my mind by telling myself that surely a 1″ wrench will be needed at some point in the future for another project on the Money Pit. I also decided that while I was at it I’d buy a new knob for the faucet since our old one was crustier than the doohickey and I might as well do it while I had the whole thing torn apart.
Upon my return I found that the 7/8″ worked perfectly and I had the old doohickey off in a flash. I put some thread tape on the new doohickey and inserted it in the hole, tightened it, put the face plate (also known as the escutcheon) back on, put on the new knob and gave it a test drive. Miracle of miracles it worked on the first try and it didn’t leak. I’m thinking I’ve earned a mid-day beer.
 Here’s a pic of our broken doohickey (click on it and the picture below to enlarge them). The white piece is what sticks into the water pipe to divert the water to the shower head. It’s supposed to be attached to the other parts, but it became separated from the “button arm” (which looks like a button when it’s installed) that’s supposed to push it into the pipe.
 Here’s a picture of the part all separated. You see that the “button arm” actually fits inside a spring which fits inside the “sleeve” of the piece. When the water is running and you push the button arm in the water pressure against the white part will keep the spring from pushing the “button arm” back out. When you turn off the water the pressure against the white part decreases and the spring pushes the button arm back out allowing the rest of the water to drain out from the tub faucet.
So for those of you who may face your own battle with a Delta faucet here’s the glossary of terms and steps for repair:
Glossary
Doohickey – Diverter
Face Plate – Escutcheon
Whatchamajiget – Valve
Steps
- If you want to be really safe turn off the main water, but I didn’t find it necessary.
- Remove the handle from the faucet. Pry off the little hot/cold top and you’ll find a Philips head screw. Remove the screw and the handle will come off.
- Remove the two screws holding the escutcheon on and then pull off the escutcheon.
- Using a 7/8″ wrench remove the diverter.
- Check to make sure a part of the diverter isn’t left in the valve hole. There was one in mine and I used some needle nose pliers to remove it.
- Insert the new diverter in the hole and hand screw it until you can’t easily turn it, then use the 7/8″ wrench to tighten. I’ve learned the hard way to be cautious with all water-related stuff so I put thread tape on the threads of the diverter before I inserted it.
- Put the escutcheon back on and screw it in.
- Put handle on and screw it in.
- Put hot/cold cover back on handle.
- Voila, you’re done!
Discover more from Befuddled
Subscribe to get the latest posts sent to your email.

This looks like what i need. It has been EXTREMELY helpful and after reading it I feel more confident in taking on this repair.
Thanks
Thanx for the info. The plumbing part warehouse site gave me the part i needed for my repair.
Hey Mark, thanks for the comment and I’m glad it worked out.
I found this very helpful, too. I have the exact same shower valve, but as luck would have it, my 7/8″ socket was too big and my 13/16″ was too small! I didn’t want to go out to try and find a 27/32″, so I just clamped my locking pliers on the “sleeve”, as you call it, and unscrewed it that way.
Aaaaaah, curses. I have a similar issue, but this is 2014 and the pictures are no longer loading on your article.
Sorry I’m a few weeks late in seeing this Francoise, but in case you still need them I’ve updated the pictures.